Software Source Code Version Controlling using Git
What is Git?
Git is a software for tracking changes in any set of files. It is usually used for coordinating work among programmers collaboratively developing source code during software development. It is a free and open-source version control system used to handle small to very large projects efficiently.
Methods of using Git
There are two ways of using Git.
- Git using the Command line
- Git using the Github Desktop Application
1. Git using the Command line
Here we execute Git commands from the command line. To execute Git commands on your computer, you must open a terminal. (ex:- command prompt, command shell, command line)
Installing Git
There are also a few ways to install Git on Windows. The official build is available for downloading and installing in the Git website. You can determine if Git is already installed on your computer by opening a terminal and running this command:
git --version
Configure Git
Before starting Git you must enter your credentials to identify yourself as the author of your work.
In your terminal, add your username:
git config --global user.name "your_username"
Add your email address:
git config --global user.email "your_email_address@example.com"
To check the configuration:
git config --global --list
- --global - always use this information for anything you do on your system.
- --local - applies only to the current repository.
You can read more on how Git manages configurations in the Git configuration documentation.
Choose a repository
Before you begin, choose the repository you want to work in. There are many providers of Internet hosting for software development and version control using Git. Such as Github, GitLab, BitBucket… etc.
Clone a repository
Repository is similar to a folder or a directory on your computer. Files are stored in it.
When you clone a repository, the files from the remote repository are downloaded to your computer, and a connection is created. This connection requires you to add credentials. You can either use SSH or HTTPS. SSH is recommended.
Open a terminal and go to the directory where you want to clone the files. Git automatically creates a folder with the repository name and downloads the files there.
Clone with SSH
Go to your project’s landing page and select Clone. Copy the URL for Clone with SSH.
Open a terminal and go to the directory where you want to clone the files. Git automatically creates a folder with the repository name and downloads the files there.
Run this command:
git clone git@github.com/mot-srilanka/website-docusaurus-skeleton
To view the files, go to the new directory:
cd website-docusaurus-skeleton
Clone with HTTPS
Go to your project’s landing page and select Clone. Copy the URL for Clone with HTTPS.
Open a terminal and go to the directory where you want to clone the files. Run the following command. Git automatically creates a folder with the repository name and downloads the files there.
git clone https://github.com/mot-srilanka/website-docusaurus-skeleton.git
To view the files, go to the new directory:
cd website-docusaurus-skeleton
Convert a local directory into a repository
You can initialize a local folder, so Git can start tracking it as a repository. Open the terminal in the directory you’d like to convert and run this command:
git init
A .git folder is created in your directory. This folder contains Git records and configuration files. You should not edit these files directly. Add the path to your remote repository so Git can upload your files into the correct project.
Add a remote
The remote tells Git where to push or pull from.
To add a remote to your local copy,
Create a project to hold your project.
Visit project’s homepage, scroll down to Push an existing folder, and copy the commands that starts with git remote add.
Open the terminal in the directory you have initialized, paste the command that you copied and press enter.
git remote add origin git@github.com/mot-srilanka/website-docusaurus-skeleton.gitAfter that you can, stage your files and upload them.
View your remote repositories
git remote -v
The -v flag stands for verbose.
Download the latest changes in the project
To work on an up-to-date copy of the project, you pull to get all the changes made by users since the last time you cloned or pulled the project. Replace name-of-branch with the name of your default branch to get the main branch code, or replace it with the branch name of the branch you are currently working in.
git pull <REMOTE> <name-of-branch>
When you clone a repository, REMOTE is typically origin. This is where the repository was cloned from, and it indicates the SSH or HTTPS URL of the repository on the remote server. name-of-branch is usually the name of your default branch, but it may be any existing branch. You can create additional named remotes and branches as necessary.
Create a branch and make your changes
A branch is a copy of the files in the repository. We can work on our branch without affecting other branches. When you want to add your changes into the main codebase, you can easily merge it with the default branch(ex:-main).
Use branches when you:
Want to add code to a project but you’re not sure if it works properly.
Are collaborating on the project with others, and don’t want your work to get mixed up.
A new branch is often called feature branch to differentiate from the default branch.
Create a branch
To create a feature branch(new branch is often called as feature):
git checkout -b <name-of-branch>Branch names cannot contain empty spaces and special characters. Use only lowercase letters, numbers, hyphens (-), and underscores (_).
Switch to a branch
You can switch between branches in order to check the states of the files and you can work in it.
To switch to an existing branch:
git checkout <name-of-branch>For example, to change to the main branch:
git checkout mainView differences
To view the differences between your local unstaged changes and the latest version that you cloned or pulled:
git diffView the files that have change
When you add, change, or delete files or folders, Git knows about the changes. To check which files have been changed:
git statusLocally changed files are shown in red. These changes may be new, modified or deleted files or folders.
Add and commit local changes
To stage a file for commit:
git add <file-name OR folder-name>Repeat the above step for each file or folder that you want to add.
You can stage all files in the current directory and subdirectory:
git add ..Confirm the files that have been added to staging. Files should be displayed in green text.
git statusCommit the staged files
You can add all local changes to staging and commit them with one command:
git commit -a -m "COMMENT TO DESCRIBE THE INTENTION OF THE COMMIT"
Send changes to the remote repository
To push all local changes to the remote repository:
git push <remote> <name-of-branch>
For example, to push your local commits to the main branch of the origin remote:
git push origin main
Delete all changes in the branch
To discard all changes to tracked files:
git checkout .
⚠️ CAUTION!
Git will simply copy the most recently-committed version of the file to your working directory, overwriting your copy. Therefore, it's crucial that you avoid this command unless you absolutely know that you don't want your unsaved local changes.
This action removes changes to files, not the files themselves. Untracked (new) files do not change.
Unstage all changes that have been added to the staging area
To unstage (remove) all files that have not been committed:
git reset
Undo most recent commit
To undo the most recent commit:
git reset HEAD~1
This action leaves the changed files and folders unstaged in your local repository.
⚠️ CAUTION!
A Git commit should not be reversed if you already pushed it to the remote repository. Although you can undo a commit, the best option is to avoid the situation altogether by working carefully.
Merge a branch with the default branch
When you are ready to add your changes to the default branch, you merge the feature branch into it:
git checkout <default-branch>
git merge <feature-branch>
Git Stash
We use git stash to store our changes when they are not ready to be committed, but we must change to a different branch.
Stash:
git stash saveor
git stashor with a message
git stash save "this is a message to display on the list"Apply stash to keep working on it:
git stash applyor apply a specific one from out stack
git stash apply stash@{3}Every time we save a stash it gets stacked so by using list we can see all our stashes.
git stash listor for more information (log methods)
git stash list --statTo clean our stack, manually remove them:
drop top stash
git stash dropor
git stash drop <name>to clear all history we can use
git stash clearApply and drop on one command:
git stash popIf we meet conflicts, either reset or commit our changes.
Conflicts through pop doesn’t drop a stash afterwards.
Git Stash sample workflow
- Modify a file
- Stage file
- Stash it
- View our stash list
- Confirm no pending changes through status
- Apply with pop
- View list to confirm changes
Modify edit_this_file.rb file
git add .git stash save "Saving changes from edit this file"git stash listgit statusgit stash popgit stash listgit status
2. Git using the Github Desktop Application
Though the Git commands executed from the command line are great from a learning point of view, there is a good user interface to work on the local repositories. ex: GitHub Desktop.
Launch GitHub Desktop
GitHub Desktop for Windows can be downloaded and installed from the GitHub Desktop website.
Work with thwe remote repository
Once the GitHub desktop is launched, we can start by cloning the remote repository to the local machine, make changes and push it back to the remote repository.
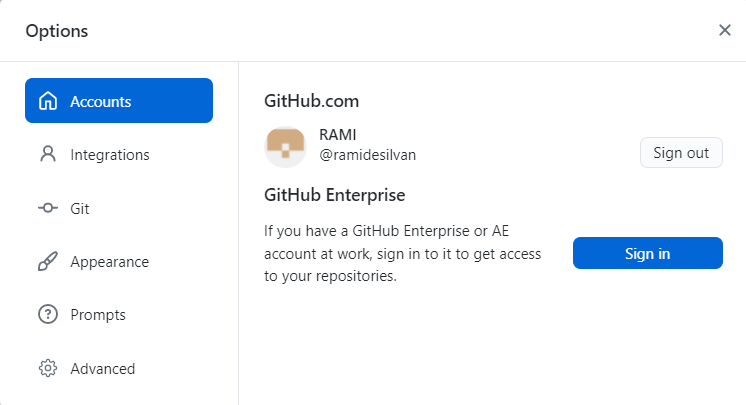
Account Settings
In GitHub Desktop, go to File => Options and ensure your GitHub account is setup.
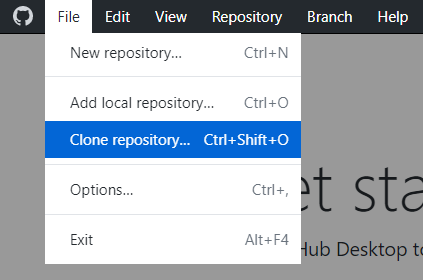
In GitHub Desktop, to clone a repository select File => Clone Repository
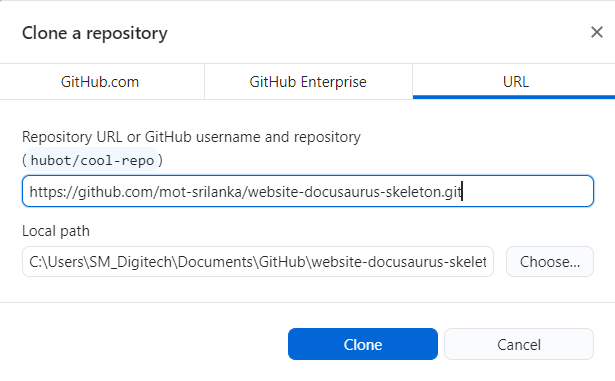
Go to the URL tab and enter the remote repository details in the form of the GitHub Username/repository. Click on Clone.
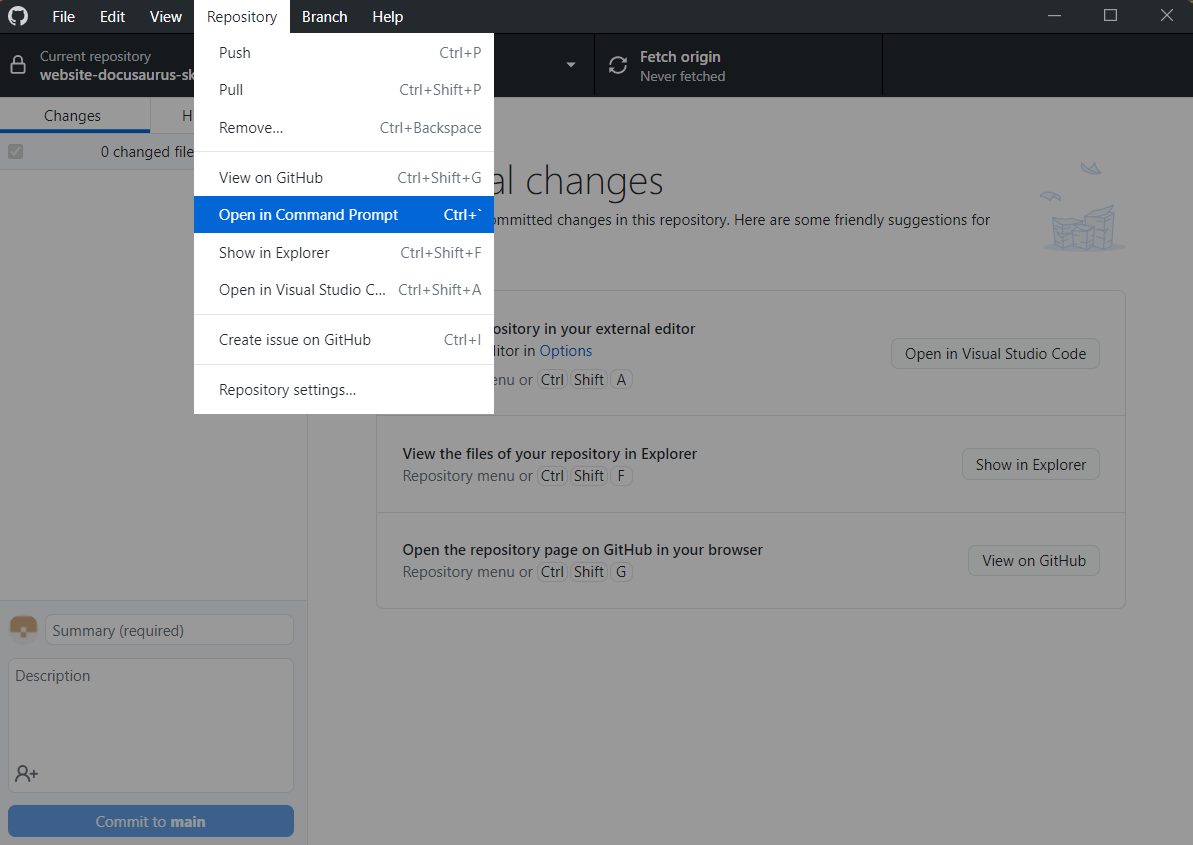
Now as the repository is cloned to the local machine, we can open the local repository contents using command prompt or explorer or even Atom editor if installed and make changes to the files.
Make changes to the files and save the same.
Back in the GitHub Desktop, you can see the RED marking which specifies if the lines were added or were deleted.

Add a Summary and Co-authors if needed and click on Commit to main at the bottom.
You will notice that most of the git commands that you execute from the command prompt have been done through the user interface.
We can now push the changes to the remote repository in GitHub. Click on Push origin.

Now the changes are visible in the main branch. To ensure that the changes are merged to the feature branch we will need to create a Pull Request.
Switch to the feature branch and create a Pull Request.
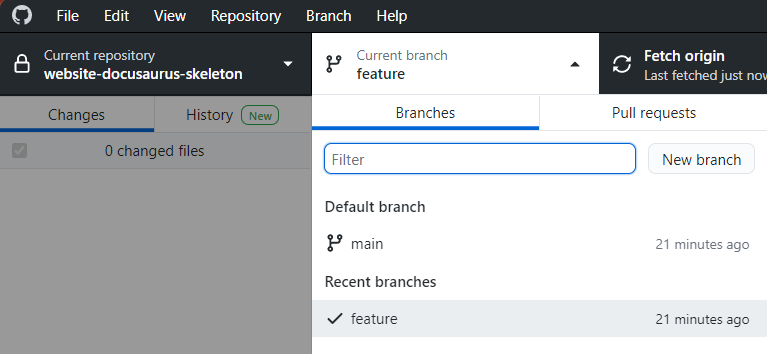
Click on Create Pull Request.
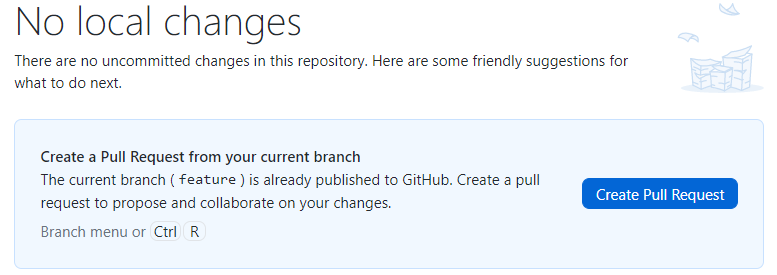
You are then re-directed to GitHub to create the Pull Request.
Proceed to create and merge the Pull Request and then finally pull(sync) the changes to your local repository.
From the Repository, the menu selects the Pull option.

Now the local repository would be in sync with the remote repository.
Create A New Local Repository And Branch
In the previous section, we learned about working with the remote repository by cloning it. Using GitHub desktop, we can also create a new local repository and push or publish the same to GitHub.
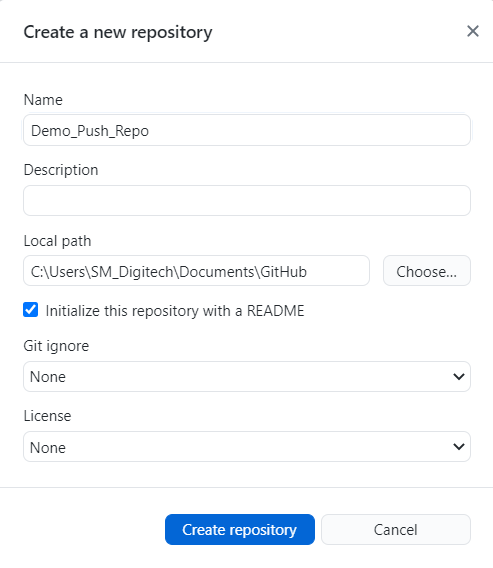
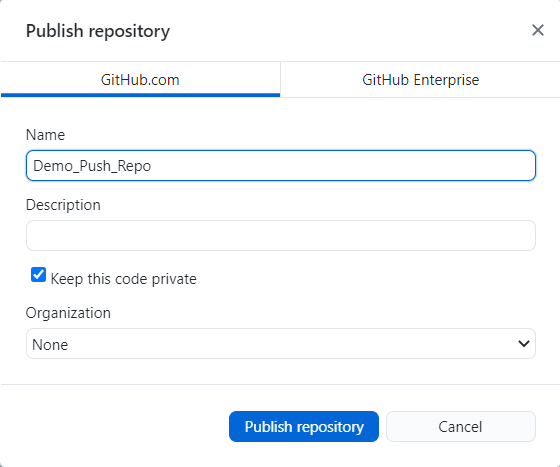
Click on File =>New Repository

Enter the name of the repository and the local path. Click on Create Repository.
As the repository is created, you can also create a branch before you publish/push the changes to GitHub.
Select New branch from the Branch menu. Call it to feature and click on Create branch.

Now we do have 2 branches and we can proceed to Publish / Push the changes to GitHub. Click on Publish repository.
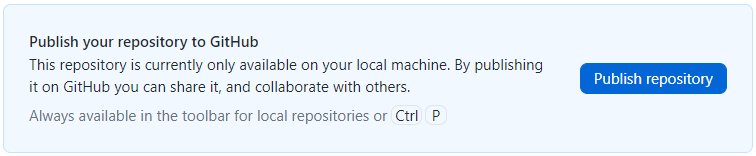
Click on Publish Repository.
As there is also a Feature branch, you must publish the feature branch as well. Now the changes can be made to the files locally and then push the changes to the remote repository. Changes in the remote repository should also be in sync with the local repository.
Merge Changes In Local Repository
Assume that there are changes in the feature branch in the local repository. We can merge the changes to the master branch. Post this we should push the changes of the master and feature branch to GitHub.
Make a change to a file in the feature branch and commit the same.

Push the changes to the remote repository.

Switch to the Master branch and click on Branch =>Merge into the current branch.
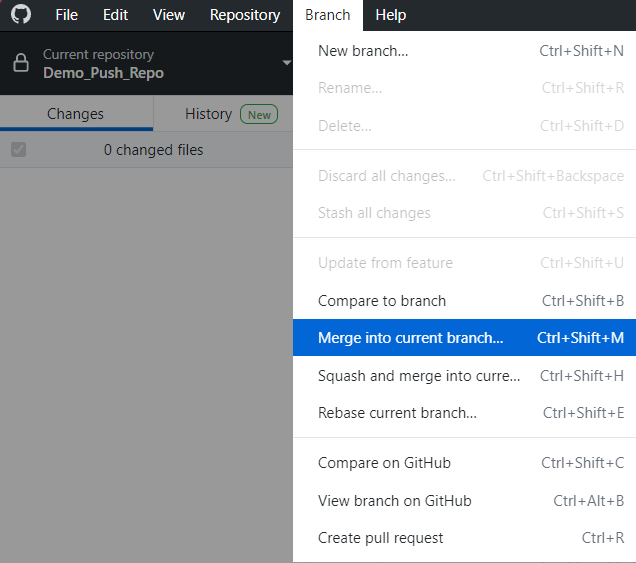
Select the Feature branch which is the source branch. Click on the Merge button.
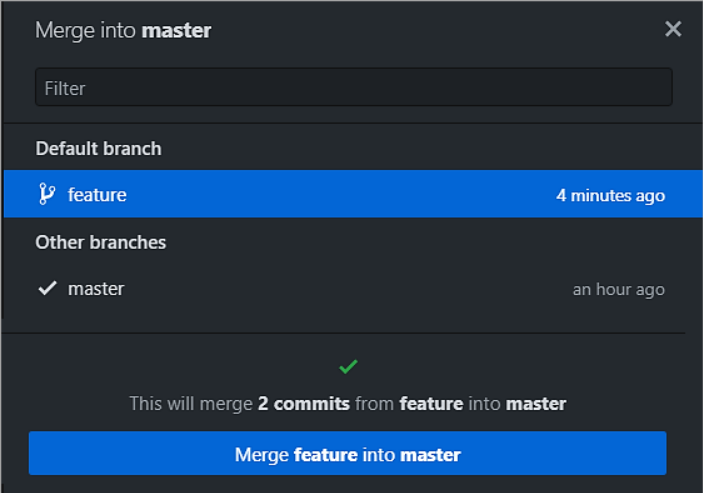
Once the changes are merged into the master branch, you can then push the changes to the remote repository to be in sync.
All the changes committed to branches in the local repository can be merged and pushed to the remote repository to be in sync.

Resolving Conflicts
There could also be a scenario where the changes have been committed to a file in the remote repository and also a change to the same file locally. In this case, the conflicts would be seen and would need to be resolved to have both the remote and local repository to be in sync.
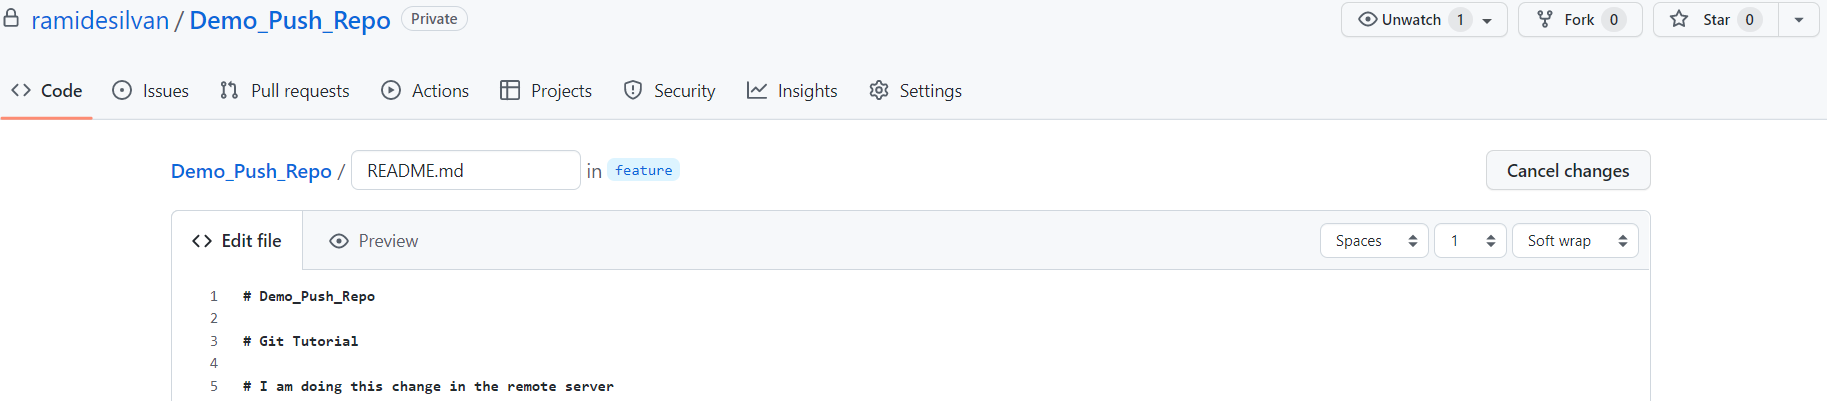
Remote repository changes committed in the Master branch
Local repository changes committed in the master branch
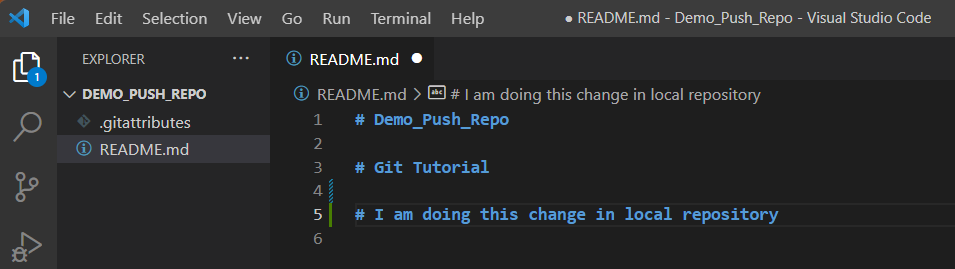
As the changes are committed to the local repository, you can now push the changes to the remote repository. The conflicts will be seen while doing this. Click on Push origin.

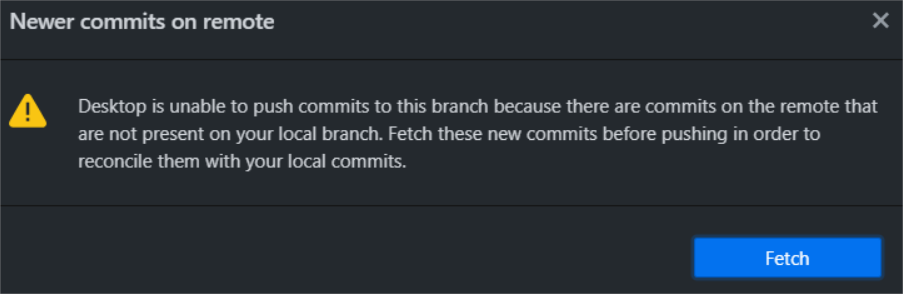
The following message would appear as there are changes in the remote repository to the same file. Click on Fetch.
Now click on Pull origin.

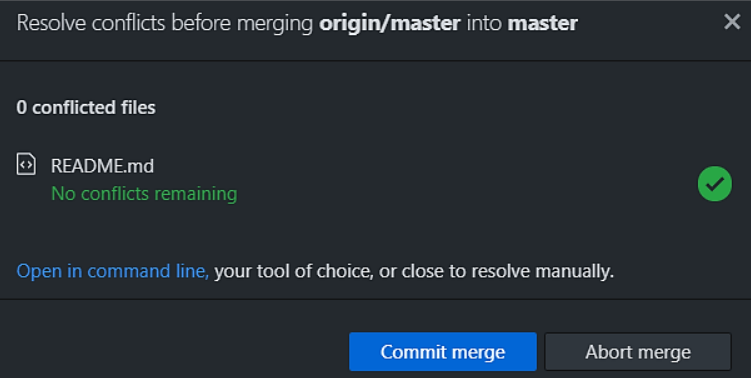
In the screen that comes up, you can open the file in your editor and resolve the conflicts. In this case, we are opening the file in explorer and resolving the conflicts.
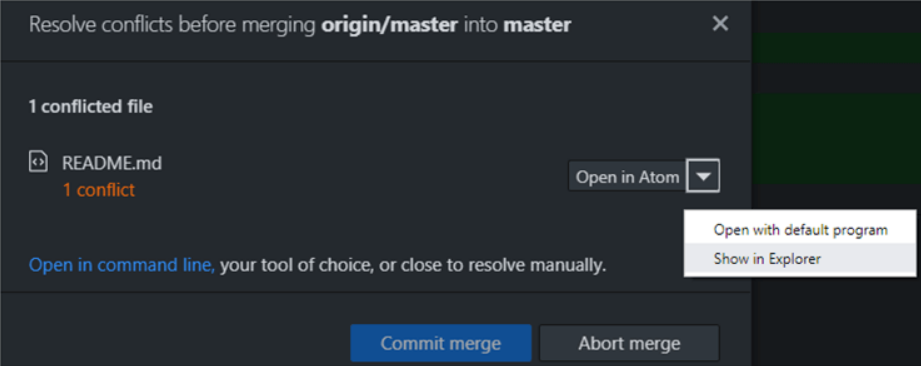
Fix all of the conflicts by retaining the appropriate content and removing the others with markers. Once the conflicts are resolved, you can commit the merge.
Now push the changes back to the remote repository. The local and remote repository is now in sync. As the changes have been done on one branch you can then create a Pull Request to merge the changes to the other branches.
